Well, as I write this post it’s now April of 2013, and I’m ashamed to say that it’s been over 6 MONTHS since my last Chevelle update! Suffice to say, a lot has been going on in my both my business and personal life during that time, some of which was better than I could have ever hoped for, and some of which that is still pretty painful. That being said, progress of the Chevelle has marched forward thanks to my great friend Jeff Allison at Allison Customs and he has steadily kept the build moving forward.
While our goal of racing the car in a few events this summer may be a longshot at best (like the red-shirt guy on Star Trek surviving the mission to…well, anywhere), SEMA Show 2013 is still squarely set in our sights. Provided funding the project can match our needs, it’s very doable to make it happen. I’m seriously considering launching a Kickstarter campaign to help keep it going. Since this car has literally been one miracle after another since it’s inception, I know that it can be done, somehow, some way.
Plus, since I’m pretty sure that I’ll go absolutely nuts if I don’t get to race a car soon, it’s in my best mental-heath interest to get this sucker done. So, without further ado…..here’s what’s been going on since the last update!
Custom Transmission Cross-Member

As you may remember from the frame update, when Jeff originally designed all of the frame modifications he did so knowing that a custom transmission crossmember would be in order at some point in the future. Well, since that time we’ve made the decision to run an LS engine set fairly low (and about 3″ aft of the original location), and we also chose to replace my nearly new TKO-600 5-speed with a T-56 Magnum 6-Speed transmission from Hurst Driveline Conversions. (By the way, we bought their really cool kit that includes the same hydraulic throwout bearing and clutch that’s used in the Corvette Z06, so it should work like “butaaaaa” right out of the box.)
Jeff fabbed up a custom crossmember using all tubular steel, making a special point to make the center section removable when it’s time to service the transmission, and he also added in exhaust pass thru’s that will easily allow 3″ pipe clearance. Since my car now sits significantly lower than it ever did before, tucking the exhaust up as close to the body as possible (and maybe even into it) is key to have decent ground clearance and making the car as drivable on the street as I’d like it to be.

As a side note, the rearward location of the engine combined with the extra length of the 6-speed transmission is most easily identifiable in the picture above. As a point of reference the tail of the original drive-shaft is sitting in the rear end, and the yoke is about a mile ahead of where it’s going to need to be. I’m planning to use a new drive-shaft anyway, but this one could be shortened in a pinch if need be.
Super Transmission Tunnel

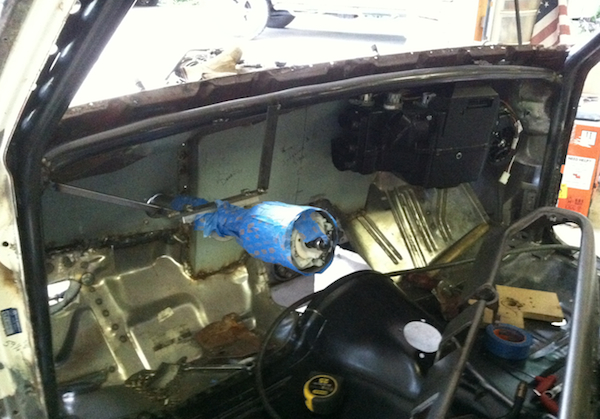
As you may have guessed from the top picture of this post, my car now has a “modified” transmission tunnel. Nearly all A-Body GM cars (Chevelle’s, GTO’s, 442’s, etc.) require transmission tunnel surgery to accommodate the girth of modern 5 and 6-speed transmissions, and since our 6-speed is both loooong and set 3″ aft of where it would normally be, it ended up needing to go fairly deep into the car.

Jeff modeled the new transmission hump after the taller more “squared off” style hump you’d find in a first generation (1967-69) Camaro. He built the the frame structure first (as seen at the very top of this post) with the body on the frame and the transmission mounted up. After that he skinned it, welded it up, and created a location to pull the shifter handle through.
Since the T-56 has a rail style shifter we’ll be able to mount the shifter handle fairly far forward in the transmission without much trouble at all and place it (essentially) in a position that most easily fits my hand when I’m in the drivers seat. We can also buy a shifter offset custom-sized from Hurst Driveline Conversions to move it forward, rear, or even to the left if need be.

Secret Weapon Preview
I’m going to leave the details of what is actually represented in the picture for a future post, but if you think it’s an emergency brake handle…..it isn’t (and no, it’s not an passenger seat ejector handle).
Again, in the future I will share more about exactly what this is, why I wanted this, and why it’s even more awesome than it looks, but when the car is in “normal” use this is an area that will be covered up by a removable console. Feel free to take your best guess about it’s purpose, though.

Next Steps
In my next update I’ll post pictures of the fully mounted up quarter panels, Dutchman panel, and tail-light housings. At this point Jeff has personally replaced or repaired every single body panel on the car, and repaired about 70% of the inner skeleton as well. Once the body is back on the frame for good we’ll get the car wired, running, and drivable and start shaking out a few bugs.
Click Here to View Every Post in The Chevelle Build
As far as the next steps in the actual project go, our estimate is that we have between $25,000 and $30,000 worth of parts, paint, and services to get from where we are today to take the car to completion. While that may seem like a a giant-leap for Rob-Kind to actually pull off, I know that it can be done, and it can be done without going into any debt.
My pal Jeff (who is doing the work pro-bono) actually talked me off of the ledge from considering a home equity loan to finish the car, despite the fact that a completed show car would be one of the best ways possible to highlight his business. He reassured me to continue building my business, doing this out of cash, and always remembering that this is supposed to be “fun,” not stressful.
It’s genuinely humbling to be a part of something this cool.
Chevelle Build Sponsors
Why This All Matters
Just as a reminder (maybe most strongly to myself), this whole project began long ago with the birth of my business, The MuscleCar Place. I had come to a point in my life where I really couldn’t handle working a “real job,” and I was ready to chase some real dreams. I had missed performing since my days of drumming in college and ever since those days ended I was trying to find a way to perform again.
I ran my Chevelle in the 2010 GoodGuys Heartland Nationals autocross, and even though I was slow I realized that performing in front of a crowd and wheeling my car as fast as I could (legally, for a change) was something I needed to do more of. Long story short, I realized then that I need to race cars to truly be the best Rob I can be, and the creation of my Chevelle is the start of my professional racing career.
Someday I plan to be the first simultaneous NASCAR and Global Rallycross Rookie despite being over 40, semi-balding, and more worried about my kids college funds than my race winnings.
Here’s a look back on my first “race.”
